#export xml
Explore tagged Tumblr posts
Visit Tumblr Blog
Explore Tumblr blogs with no restrictions, modern design and the best experience.
Last Seen Tumblr Blogs


Fun Fact
There are dozens of funny blogs to kill time on Tumblr.
Text
How to Export and Import WordPress Posts and Pages: A Beginner's Guide
Managing a WordPress website comes with its challenges, but exporting and importing posts and pages shouldn’t be one of them. Whether you’re migrating to a new host, creating backups, or sharing content between websites, WordPress makes this process surprisingly simple. In this beginner-friendly guide, we’ll walk you through how to export and import your WordPress posts and pages, step by…
#backup WordPress content#export WordPress posts#how to export WordPress posts#how to import WordPress pages#import posts to WordPress#import WordPress pages#manage WordPress content#migrate WordPress content#transfer WordPress content#WordPress#WordPress admin tools#WordPress beginners guide#WordPress export and import tutorial#WordPress migration#WordPress tools#XML file WordPress
0 notes
Text

Posing Interaction for Babies (Newborns)
This mod adds an interaction to the bassinet to play poses with babies.
Based on my testing the interaction works wherever the sim is, even off lot. The baby spawns to your sim and afterwards back to the bassinet (little demo below).
As a placeholder I included a set of Gallery poses with babies. However, you can override them with your own. For that purpose, I’m including the pose files separately as well as the blend file I used that you can then use as a base (the blend file is saved in Blender 3.6). (You don't need to put the blend file into your mods folder.) Here is an alternative set of poses I made that you can use with the interaction.
XML Injector Required The XML injector is a tool/library that can be used to add interactions without the need to write your own script (another one that you might know is lot51’s core library). A script in my case would have been needed to add the posing interaction without overriding the existing game file with the baby tuning. The XML injector does that for me.
Download: SFS (*) | Mediafire
(*) Reuploaded the file to SFS on Feb 8th 2025, the old link was broken (I probably deleted the file by accident at some point).
This was just an experiment tbh but I was surprised that it works so well and so I ended up wrapping it up. But anyhow, in game interactions are pretty new to me, so let me know if there's any issue.
If you need any help making your own poses, you can also drop by in our Discord server for pose makers.
Some background information:
The baby is an object in-game that is connected to the adult sim via the stigmata bone for poses/animations – similar to poses with accessories, if you’re familiar with that. The difference is that you also need to pose the baby itself. I have some additional notes in this tutorial for Gallery poses with babies that I made a while ago.
Note that you can’t export baby poses or animations via S4S the standard way since you can’t select the baby rig in the S4S export options. I did this with a workaround by exporting the clips from the Game File Cruiser, then importing them to Blender using an add-on (it’s actually a deactivated part of the Blender add-on that S4S uses and it’s only functional in Blender 2.7).
However, you can import the blend files with baby poses to the package file like you normally would since the rig selection is not relevant for the import.
Below a little demo, sorry for the bad quality :D
@ts4-poses @luthsthings
971 notes
·
View notes
Text
yeah i found it in my google drive !! 👽👽
ahem. the loathing testmic edit that i lost but somehow managed to get back
tag : [ @cloudstongue : because they requested the edit i.believe ]
9 notes
·
View notes
Text


@selemchant @noxconsortium
Here's a breakdown of what I did
I went through the ">conversations" section, looking for which files actually made up the dialogue trees. It's a little different than Inquisition, but I eventually found that they seem to be within the "FC_ConvFlowLayer" files.


Frosty actually has the strings linked correctly within these files, but it's very cumbersome to look at in Frosty. I wanted to make it easier to read. When you export these FC_ConvFlowLayer files, they are .xml files that link to numbers instead of strings.

When you export the raw script of DAV from Frosty Editor, every line is paired with the same matching little numbers (minus the first "0x" for some reason).
The raw script is a .csv file that looks like this:

So I added an "0x" to every line of the .csv file (so they would match) and then made a python program that found all the strings within the <StringId></StringId> tags in all the xml files, and then looked up the matching number in the Raw Script .csv file and then saved the second column (the text) from the .csv file into the .xml files.
So now instead of numbers, I have strings:

Now, these .xml files have a lot of information in them that someone smarter than me could figure out how to make a comprehensive dialogue tree out of, because I think all of the information you would need is provided by the xml files. But that's hard and for now I just wanted a .txt file of who spoke what line.
It wasn't hard from there to write another little program to extract just the speaker and the lines into a plain .txt file

And then to merge all the text files together and use notepad++ and the power of regular expressions to clean them even more:

IF YOU WOULD LIKE TO PLAY AROUND WITH THE .XML FILES THAT HAVE THE NUMBERS REPLACED WITH STRINGS but that still have all the conversation information intact, like how each of the lines are linked to each other, I uploaded them here on google drive (there are 1500 files, but they're pretty small):
LINK TO THE XML FILES FOR YOU TO DO WHAT YOU WANT WITH
#Dragon Age#Veilguard spelunking#Veilguard spoilers#DA4 spoilers#long post#sorry I used a spoilery example lmao
58 notes
·
View notes
Text
Repost of my Mini WantTrees tutorial
Mini tutorial on custom WantTrees using the Break Up want as an example
Don’t ever open WantTrees without doing this though: Copy and paste your WantTrees (in Program Files not Documents!!) into a safe folder. Do not open it while it is in your Program Files.
Then, when it is safely somewhere else on your PC, you can open it, edit it, and then just copy and paste it into your program files. I always make a BACKUP of the Maxis want trees when I do this. I keep a folder of several different WantTree versions actually and I change them based on the hood (for example, Roaring Heights is edited to have no computer wants etc.)
Needless to say, you should only have one wanttrees at a time in your Program Files and only edit the boolean keys inside the individual WNTTs or … you could delete entire WantTrees but … I wouldn’t advise it.
In WantTrees in SimPe, it will look overwhelming. But gradually you will get used to it. The three instances for “Break up” wants are 0x6DB3A03E, 0xADE345CE and 0xCDCE5F06! You can sort by Instance in the WantTrees package. Let's look together! First, ensure you are looking at this file in the RESOURCE LIST

You will see a very long list of text files. They are basically just Notepad files and you can export them as text files for easier use, but I just edit them in SimPe.
Open those instances that I mentioned by clicking on them in the Resource List and then switching to PLUGIN VIEW and you will see what looks like this

What you want to be looking for is this line:

This tells you the name (and the ID number directly after the name) of the Want that the game is trying to assess based on the selected Sim.
If it says "alphaTrigger" then it is a Want TRIGGER, which means an event that happens in the game that triggers certain wants, so don't mess with those!
From this first section of code, it looks like the game is applying the upcoming wants to becoming a teenager - with a TRIGGER of the Sim becoming a Teen.

Once we scroll down, we get to the next referred want or want trigger. This one is what you need! It just says "alphaFallInLove" so this is referring to the want to fall in love, NOT a trigger. This can be verified by using PickNMix's object and want spreadsheet to check the 8 digit code AFTER it says "AlphaFallinLove" : the want ID for this particular want is cdaa9450
So, this section will tell you the Want that it's referring to, but you still have scrolling to do!

THIS is the important section. This section is determining WHICH TYPE OF SIM can roll this want!
From this, it looks like the Want is weighted heavily (do you see where it says WEIGHT? and it's set to 100?) to be rolled by Family Sims, but there are some other details that I am not sure of, so let's just look at the "Break Up" want.

Ok, we found the actual want. Now to scroll down and see what types of Sims are coded to roll this want.
I would also suggest looking at the order of the wants that are referred to. It can be confusing to figure out what MAXIS was doing, but often, if you scroll down to the VERY END of the XML editor, you will see comments from MAXIS explaining the specific WantTree. But not with all of them! It takes some context clues!

So, as you can see, in the "Age" section, Teens are the only ones who can roll the Break Up want. All you need to do is change where it says "False" to true for Adults and Elders!
Then you can add your own customizations! In the aspiration section, it is coded that only Family aspiration can roll the Want to break up, but what about changing False to True for Pleasure Sims? Try it out! Also, to reiterate, do you see where it says WEIGHT? And how it is set to ZERO for all the sections? I would play around with that. I assume certain wants are WEIGHTED to be rolled by certain ages, aspirations, or personalities.
Also, let's edit personality! Why not? Let's change False to True for Mean Sims to want to break up, and Serious Sims! notice I also changed the Weight

Now, this is untested, but the worst that will happen is wants will get rolled that don't make sense for your selected Sim.
You can play around endlessly with this. Just don't touch the TRIGGERS, only play with where the actual WANTS are being referred to. And investigate the ORDER of the sections ... most of the time the ORDER of the sections suggests a PROGRESSION of wants being rolled.
Any more questions? If so, feel free to DM me. I'm at my computer a lot :)
Happy Simming and modding!
#sims 2 simblr#sims 2 gameplay#sims 2#sims community#sims 2 guide#sims 2 wanttrees#sims 2 wants#sims 2 simpe#simpe#Sims 2 modding#the sims 2#ts2
30 notes
·
View notes
Text
I usually do not recommend apps because I hate things that look like advertisements, but I recently took a long journey down the road of "I want to backup an SMS conversation with tens of thousands of messages" and ran into so many roadblocks and pitfalls that I wanted to share the only thing that seems to have worked. I am also sort of hoping that people with more Android chops will say something like "oh you missed officially-supported option XYZ" or something like that.
1. Google will backup your SMS but unless you pay for Google One, your MMS will be lost—so all the photos etc in the thread are gone.
2. Moreover what is in Google One will not be downloadable into a format that you control. The only option is to port to a new phone.
3. Moreover even if you use Google Takeout to try to download that archive from Google One, the result is busted and doesn't include said media.
4. Many of the other apps have a "free trial" that is so hampered that you cannot actually make a single archive.
5. The app I found will export a massive XML file to one of several filesharing services—Google Drive, Dropbox, and Onedrive—as well as a local backup that can presumably be ported over USB. The app has an associated web viewer, which has problems with loading all the videos and pictures in a long text chain, presumably because it is trying to cram the entire thing into the DOM. If you unselect loading those, you can "click to load" them afterwards, and this works, although it can cause the scrolling to get lost.
6. However, the fact that it's an XML file means you can do SAX parsing of it, even though there could be 100MB videos in the "data" attribute of some of the tags (!). I've already been experimenting with doing that—written a little parser that sends everything to an SQLite3 database.
7. The format of the dump seems to be. "smses" is the root tag pair, and within it are tags of type "sms" and "mms". "mms" can contain two children, "parts" and "addrs". A "parts" tag can contain multiple "part"s which contain the "meat" including the "data" attributes, which seems to be where all my pics and videos have gone. An "addrs" tag contains "addr"s that seem to be just participating conversationalists. There's a hell of a lot of metadata stored in the attributes, not all of which I have deciphered beyond the datatype of each field.
8. I think I want to actually do the whole SQLite3 song-and-dance and just dump pictures and videos to some static folders. Then you could write a small local webserver to deliver a properly scrollable and searchable version. But right now, having a backup that I can save to a USB or several is really comforting.
15 notes
·
View notes
Text


Sodie Snakification Modifications!
Buckle up because I have a LOT to tell y'all about the making of this one.
From the beginning I knew I wanted the new Sodie snakifications to be based more on the liquid drink itself rather than the straws and can it comes in. I knew that would involve some playing around with new materials, but I had no idea the ordeal I was in for.
Initially I had dedicated a very small unused area of the Sodies' texture maps to a transparent colour that would be used for the 'liquid' parts. I first tested it on a placeholder head part and it worked just fine. But when I went to use it for the limbs, there was no longer any transparency. This confused me.
And so began a several days long search for the solution to this, which involved custom materials, testing different geometry, and even messing with xml and irrlicht files. Unfortunately nothing worked. I knew my textures and materials were not the problem because transparency worked on the head part, but for reasons I couldn't fathom it only worked on the head part. And I knew transparency was possible on limb parts because the Hunnabee parts use it.
Eventually, I got an answer from the Young Horses developer Kevin on the official Young Horses Discord server. Apparently, all I needed to do was copy a line of XML from the Hunnabee definition file to the definition file of my Bugsnax of choice. Honestly I'm not sure how I'd missed that in all my previous efforts. The name of the value I needed was "InventoryHasTransparency", maybe the "inventory" part threw me off? Anyway, I have to give my greatest thanks to Kevin for once again saving my mod (the first instance was right at the beginning)
So I had working transparency on the limbs, but at that point the limbs were just flat-coloured without any bump/normal detail. The space the limbs occupied in the UV layout was far too small to put any meaningful detail in.
The thing with Bugsnak UVs is that the eye UVs take up (in my opinion) a lot more space than they need to. One could optimise the texture space significantly by overlapping identical eyelid, pupil, and eye UV islands. I could do this easily, except the animated models of the bugs themselves us .X (DirectX) files instead of .obj files. I have had zero(0) luck with working with DirectX files in Blender. The importer breaks animations, and every exporting option breaks them further.
However, I had a cheeky solution. You see, DirectX files can be opened in Notepad++ and have semi-comprehensible blocks of text data. This includes texture/UV layout data. So if I could import the Sodie's DirectX file, ignore the broken animations, change the UVs, and re-export it (once again ignoring the broken animations), I could theoretically just copy the modified texture layout data from one to the other.
The only problem was that I was exporting as an obj or fbx file and then using FragMotion to convert it to a DirectX file, and Fragmotion insists on triangulating any tetragonal polygons. This, for some reason, absolutely breaks the result of my attempted data transfer. Thankfully I found an online converter that converts fbx files into non-triangulated DirectX files, and my convoluted UV data transfer plan ended up working perfectly.
With that, I had plenty of space to put a much nicer bubbly liquid texture, and use that for the limbs. Anyway, I'm running short on time today, so thanks for attending my TEDtalk.
81 notes
·
View notes
Text
SimPE Mini-tutorial
How to import TXMT settings with texture name and make it work *
*How to properly transplant material settings from one recolor package to another, including texture Filename / How to link two or more recolors to one texture resource.
Export is straightforward, you click Export button (it's next to Import button) in Properties Tab and save xml. You import it the same way, but in case of Buymode/Buildmode stuff there's an extra step required to correctly link the textures: File List Tab has to be updated.

You can use this method to link shadow TXMTs in your 4t2 conversions to 4t2 Shadowfile texture by @lordcrumps (first you need to export the Shadowfile TXMT settings ofc).
*instead of importing all settings, you can copy-paste only texture filename (stdMatBaseTextureName property Value). There's also an option to merge the settings.
*CAS Stuff recolors (hairs, clothing..) don't require editing File List, you just import settings, commit & save (also, "Type" located in cMaterialDefinition tab affects the clothing texture, makes it use Sim body texture for transparent parts, or not).
(I already shared similar tut but that one is about changing the settings and keeping the texture)
99 notes
·
View notes
Text
No-Google (fan)fic writing, Part 5: Obsidian
Storytime
In terms of how long I’ve been using Obsidian, well. Currently, a little more than a week ^^ And I’ll be honest, I’ll probably only use it for writing fic sporadically, because it’s proprietary software and I prefer Open Source (and I also love LaTeX too much, but that’s a different question).
The reason why I decided to give it a try in terms of writing fic was that I’ve been talking with others about moving to Markdown, Obsidian is Markdown-based and I’d been playing around with it in a different context for a while already. So, out of curiosity, I decided I’d try to write a story in Obsidian and see if it could live up to my demands.
Word/Google docs versus Obsidian
Again, Word and Obsidian do not work in the same way. If anything else I have described here so far can be compared to the way Obsidian works, it’s Zettelkasten. The same principle of “one note for one idea/scene/thought” also applies to Obsidian. Also like Zettelkasten, Obsidian relies heavily on connecting these notes by way of links, using tags to categorise/find specific notes and it also has the same feature of using folders for collecting “sub-notes”, which can be used for structuring in the same way the virtual desk is used in Zettelkasten. Actually, I would say that the main difference between those two is that Obsidian uses Markdown and a folder-with-subfolders structure, whereas Zettelkasten has its own file format and relies on XML behind the scenes.
Cost
The personal use version of Obsidian is free, so technically +1 for that. However, Obsidian is not Open Source. It is not free in the same way Writer, LaTeX, Zettelkasten and Markdown (= many MD editors) are free, the code behind it is proprietary. This does not have any impact on the cost, at least not at present, but there is a chance that at some point, the developers might choose to charge for private use of it. I think it’s unlikely, but. Just so you know.
File formats
Unlike Word, however, Obsidian relies on Markdown as its file format and stores every “note” as a separate .md-file in a folder. The “notebook” where all notes are collected is called a “vault” and it’s just one big folder with lots of subfolders. In other words, even if the software is proprietary, the files can be read and used without needing Obsidian itself. Which is really great, because again, it means you have plain text .md-files with your ideas, scenes and stories, and they wil be readable even if Obsidian as an app disappears.
+1 for that!
Features
What you need Obsidian for is the features. And of those, there are many. I’ll save words and say, read about Markdown features like bold, italics etc. here, but I really do want to talk about other features Obsidian offers that plain Markdown with an editor does not.
Firstly, an important feature that I talk about a lot is the export function. AO3 needs either HTML or RTF, fanfiction.net ODT or DOC(X). Obsidian can export to all of these, provided you install the Pandoc plugin. This is not the same as installing Pandoc on your computer; you need to install the plugin in Obsidian itself to use it. But as long as you do, you can export to whatever you like.
+1
Another feature very important for me when I tried Obsidian was whether outcommenting would work (again, I’ve talked about this here). Basically, what that means is that parts of the text are not exported when you export the rest of the note – such as comments to yourself, notes on what you still need to write in a scene or simply – as I use it frequently – stuff you wrote and don’t want to delete, even it doesn’t fit anymore. Much to my delight, it works in Obsidian as well, again because it’s Markdown and it works in Markdown. [text you want outcommented]: # will do the trick.
+1
Lastly, another plugin I would recommend is Smart Typography. It “[c]onverts quotes to curly quotes, dashes to em dashes and periods to ellipses”, as the description says, and that’s really useful if you use a regular keyboard layout to write, where you get the standard ' and ".
+1
Installing both the Pandoc and Smart Typography plugins is easy. Open the Obsidian vault settings (the little wheel you can see in the left lower corner, to the right of “example”, which is the name of the vault), Third-party plugins (which you need to enable) and then browse Community plugins by name and install and enable them. Done.

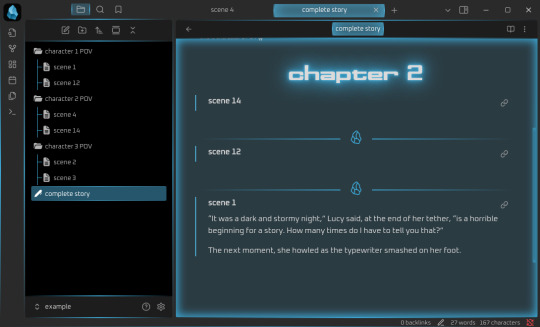
Now for the most important part: putting together a story.
If you want one big vault containing all of your stories, you need to create “folders” for every story and then store the single notes for that story in that folder. Personally, I prefer to have one vault per story, because I find it a lot easier to focus on working on one story at a time if I don’t have several other stories in the same vault. This, I want to note, is different to how I used Zettelkasten, where I generally had one big Zettelkasten containing all of my stories for a specific fandom. I don’t know why that’s different with Obsidian, it’s just that way.
In any case, the following examples are for when you have one story per vault. In this case, I’ve decided that I’m going to write a story involving the POVs of three different characters. I’m going to keep their respective pieces sorted by character, so I always know who’s talking right now. Every scene where that character is the main narrator gets its own note within the respective character folder.

This, in theory, is no different than what I do with regular Markdown. What is very useful in Obsidian, however, is that Obsidian offers the possibility to “embed” notes in other notes.
And that, in turn, means that just like with Zettelkasten, you can use one note to put together the whole story and move around scenes without ever having to worry that you’ll accidentally delete and lose texts while copypasting.
It works like this: [[name of note]] establishes a link from one note to another (useful if you want to connect different ideas). If you add ! before the brackets, like so: ![[name of note]], it means that the whole text of the linked note will now be embedded in the note with the link. Which will give you this:

And, because you’ve installed the Pandoc plugin, this will now allow you to export the note named “complete story” to HTML, ODT or whatever, and all of the linked notes will be exported into that file. You need to change the order of scenes or move one scene from chapter 1 to chapter 2? Just delete ![[name of note]] in chapter 1 and put it in chapter 2. You can also insert horizontal rules, by the way, which I have done here. These will also be exported.
If you need your story structured in chapters rather than as a whole, the process is analogue: one note per chapter, where you !-link all the scenes that belong to the chapter in question. Then, if you want it as a whole, create a note where you !-link the notes for the single chapters, done. Export at your leisure.
Embeds are hands down in my opinion the best feature Obsidian has. They offer a distinct benefit over other Markdown editors like Ghostwriter, KATE or Notepad++, because Markdown, other than LaTeX, does not come with a feature that would make it easy to include “child files” in a “parent Markdown” file that only includes the header and the child files in the order in which they should appear in the final output document. Thus, none of the three editors I like to use for Markdown can show me the whole story if I decide to create a separate file for each of the scenes, and that is really annoying, because it means that I’m back to cutting and pasting pieces of text from one part of my Markdown document to another. Which in turn increases the probability that I will lose something, and well. See Zettelkasten as to how I feel about that.
So that is definitely an extremely useful feature deserving a big +1 because like with Zettelkasten, it means you can move the order of your chapters and scenes around without running the risk of losing the actual text.
Interface
Something I find quite enjoyable is that there are a lot of “skins” made by the community that can be applied to Obsidian. This is important to me because, as the previous instalments have probably shown, I’m a big fan of simple, clean, customisable interfaces. I’ve tried several of the community-made skins already, and my current favourite is Cyber Glow – but there are also others I’ve found quite nice.
Again, skins can be installed via the wheel/settings button, and just to show it, the below is the vault from above with Cyber Glow enabled.
Syncing
One of the big benefits of Obsidian is that it comes with a syncing service. Yes, you don’t need anything else, you can just create an Obsidian account and your notes will be synced across your devices, even on mobile devices. And file versioning is an option (I’ll get to that in due time). And that is really great, because it’s a one-in-all solution.
If you don’t need or want that, you don’t have to sign up for it. You can also continue syncing your Obsidian vaults with your preferred service (Dropbox, OneDrive, GIT, USB etc.). But you can and it’s at least nice to have the option. Downside: sync is a paid-for service, starting at 4$/month for 1GB of storage. Which isn’t a lot generally, except you’re writing plain-text/Markdown, so your files are Kb-tiny in most cases, and it takes a lot of Kb-sized files to fill up 1GB.
Personally, I will say that I’d much rather pay 4$ a month and know that my stories are not going to be scraped for AI, but it’s really a decision everyone has to make for themselves. Just remember – if you aren’t paying for the product, you are the product.
Ease of use for Word/Google doc-users
It’s not intuitive in the same way as moving from Word to LibreOffice Writer is. At least having a look at some Markdown guides (linked over there) is important if you are going to use Obsidian. But as I wrote there already, Markdown takes you about half an hour to learn, if you don’t know it already. And yes, you’ll have to wrap your brain around the concept of “one note = one thought/scene/idea” as well, but honestly? In terms of cost-benefit ratio, Obsidian is probably one of the most rewarding transitions you could make if you’re looking to get away from Word/Google docs. My only gripe with it is really that it’s proprietary software, but otherwise? Definitely recommended.
Read No-Google (fan)fic writing, Part 1: LibreOffice Writer
Read No-Google (fan)fic writing, Part 2: Zettelkasten
Read No-Google (fan)fic writing, Part 3: LaTeχ
Read No-Google (fan)fic writing, Part 4: Markdown
#degoogle#no-google (fan)fic writing#fanfiction#fic writing#fanfic writing#degoogle your fics#degoogle your writing#software recommendations#resources#obsidian
9 notes
·
View notes
Text
I've had a few folks ask me about creating a blog series on how I made the Premade Sim and Relationship Overhaul mod, and how they can do similar projects. This is the first of four or so blogs on the subject, starting at the beginning - creating new premade sims, including occults. Please note that these are intermediate level tutorials, and assume you are familiar with the basics of XML modding, Sims 4 Studio, and the Premade Household Tool.
--------
Creating New Premade Sims
The biggest tool in your arsenal of creating new premades is Denton47's Premade Household Tool, available here: https://modthesims.info/d/669907/ts4-premade-household-tool.html. It is a fantastic and very straightforward tool - you create your new premade sim (or make over an existing sim) in a save file, exit out of the game, and then open the tool and load the save, extracting the household. If this is an override of an existing household, you'd want to check a few boxes, if a new household, you don't need to. There are instructions on the actual mod page that are much more thorough so I'm just glossing over that here for the sake of time.
What you need to know is that, to add new premades, you need to assign them to a specific world either as a townie or as a resident of a specific lot. Assigning townies requires overriding a region description, and these overrides conflict*, so you will need to carefully consider what region you want to use. For example, my Aliens Reloaded mod uses Sixam to add townies in order to avoid conflicts, as Sixam is the aliens world. You can safely add multiple housed sims to the same region even with different mods/files, so long as they're assigned to different lots. If different households are assigned to the same lot, then generally only one will get successfully added. Please communicate to your mod users what region or lot you're using.
[*It may be possible to add townies to the same region via script injection - I am currently investigating this and will update this blog if I find a method.]
To ensure safety if someone does not own a pack, or if they disable a pack, please make sure to edit the group number of the world description and/or world file so it matches the pack the world is from - for example, Get to Work, or EP01, has a group number that ends in "03". The latest version of Sims4Studio will allow you to select the DLC in a dropdown and will automatically set the group number for you.
If you are making a special NPC or special NPCs, then to protect them from Neighborhood Stories and MCCC make sure to also set their household status to "Hidden" in the Premade Household Tool. You can edit this in the edit tab.
--------
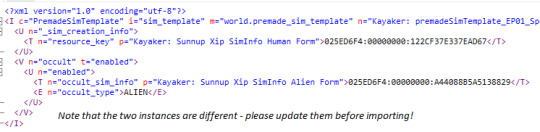
Creating Two-Form Occult Premade Sims
Occult sims are a bit more complicated to create than regular premades - especially if they have two forms, like aliens, vampires, mermaids, and werewolves. First, make sure when you save your save file they are in their human form. It is important to extract their household data using the Premade Household Tool when they are in their human form or else the extraction will grab the wrong information and they will spawn incorrectly with missing data.
Second, these sims need a few additional steps. They need premade household templates and premade sim templates to be added to them, and you also need to separately extract their human and occult form SimInfo data from your tray files using Sims4Studio or another program (just make sure to save them to your library first).
To extract using Sims4Studio, go to "Content Management" -> "My Library", right click on the household you want and export to whatever folder you're using. You will see three files exported. Human, Occult, and Sim. You only need the Human and Occult files. You can safely delete the Sim file.
These two files (Human and Occult) must be imported into a package file, preferably with your premade household and premade sim templates. Since the instance numbers of these two files are the same, please change them before importing, as importing these files without changing the instances will result in only one file actually making it into S4S.
Here is an example of the editing you should do - paste the new unique instance between the exclamation points as shown. This should be a unique hash of some kind to prevent potential clashes:

The new SimData must be referenced in their premade sim templates like so:
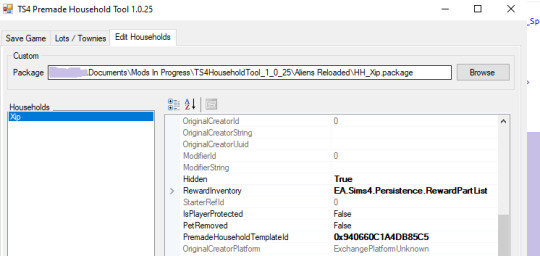
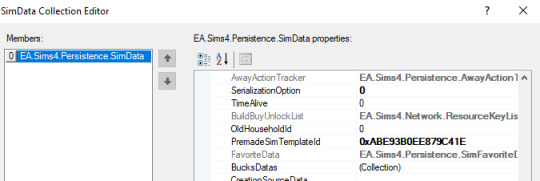
Once that is done, you'll need to open the household data in the Premade Household Tool, navigate to the Edit Household section, and paste in the instance number for your sim's premade household template into the household section, then go to Sim -> Gameplay Data -> Premade Sim Template to add in the instance for their premade sim template.
Please note that this process only works for creating a premade occult sim. There is, as of the moment I'm writing this blog, no way to create an occult sim with a specific look from a tunable sim template. So if you want to make a special two-form occult NPC that has a specific in-game purpose, you will need three templates - the premade household and sim templates to add your sim of choice to a new save, and a tunable template that will create a randomly generated sim with the proper traits and skills in users' existing saves (or if your premade dies or is otherwise unavailable/invalid).
Spellcasters are not two-form occults and, if you are creating a premade spellcaster, then you do not need to do the extra step with the SimData. If you are creating one from a tunable template, just make sure to add their spellcaster trait so they are recognized as a spellcaster as it isn't possible to add occult simdata to a tunable sim template.
--------
Occult Sim Fixups
Keeping on the subject of occults, you will likely notice that some data does not survive the process of the sim getting turned into a premade. Things like occult rank, perks, and unlocks will need to be manually set through different types of fixups. Spellcasters specifically are a bit of a pain and require a special process, as NPC spellcasters are not coded in such a way that they can actually learn spells and fixups (adding in additional data to "fix up" a sim) can only happen when they are actually added to an active household.
For Vampires/Werewolves: these fixups are best done via loots. If you are using a script file to deliver relationship loots on new save start (like my Premade Sim and Relationship Overhaul mod does), then you can have your vampires or werewolves deliver these loot from themselves to themselves and set their appropriate rank and unlocks that way (I will share more on this process later). Alternatively, you can assign them a self-deleting trait. Trait -> loot on instance -> have the loot set rank, etc -> have the loot delete the trait so it won't fire the next time the sim instances in.
For Spellcasters: spellcasters are coded differently than other occults. The most important thing to know is that only spellcasters in households that have been played at least once can do magic and everyone else is just faking it. "But why do spellcaster premades, townies, and the sages have spells when I add them to my household?" you might ask. That's because the devs gave them hidden fixup traits. You will need to do the same with your premade spellcasters. This fixup trait should have your spellcaster's rank, unlocks, and spells specified on it, and will take effect when the sim is added to an active household and is no longer considered a NPC.
For examples of how these fixup traits are supposed to look/work, please see any of the simInfoFixup_Magic_Spells traits. You can check them through tools like the XML Extractor, the TDESC Browser, or directly in Sims4Studio.
You can add extra loot to make these self-deleting, but I have not bothered as users won't generally see these traits unless they're messing around with MCCC.
Mermaids and Aliens do not require fixups, as they do not have skill trees unless you are playing with mods. If you are playing modded, generally the abilities are added through hidden traits, and you should assign these through the standard Premade Household Tool process to avoid potential errors on new save start if someone disables a pack (I will expand more on this in a later blog). The premade Aliens Reloaded aliens generally use this method.
--------
Milestones Fixups
Milestones fixups follow a similar logic to spellcaster fixups. Without mods, premades, townies, and NPC sims that have never been played do not have any milestones. Existing Maxis premades have fixups on their premade sim templates that add these milestones when the sim becomes played. However, this does not work quite so well for our purposes, as users without Growing Together get errors on new save start if you try to add milestone fixups via a premade sim template - even using the group ID trick. At present, only Maxis/EA premades can use this method safely.
I'd recommend instead using a self-deleting trait to assign the milestones via a loot. The procedure is trait -> loot on instance -> milestones loot -> delete trait. You can add a test to the loot on instance to make sure it only runs if the sim is in a played household.
Make sure the trait and your initial loot have the group number for Growing Together (EP13 = 00000036). If you have a milestone that belongs to another DLC (not Growing Together) it should be chained inside of the Growing Together loot, using an action to deliver a second loot with your DLC-specific milestone. The second loot should have the group number specific to that pack. Please be very careful when assigning milestones, as they are very unsafe and may cause save issues for users. Test thoroughly!
The next blog in the series, "Setting Premade Sim Relationships" tackles the topic on setting relationships between different premade sims on new save start and have more on pack safety and chaining loots. Available here.
11 notes
·
View notes
Note
Hi!!! just saw your post with the audio and was wondering- how did you manage to export the audio tracks that were crashing :O
It's slightly tedious and took 3 separate programs but here's what I landed on (with thanks to people in the Frosty discord who figured this out for other games in the past because the method apparently still works for Veilguard)
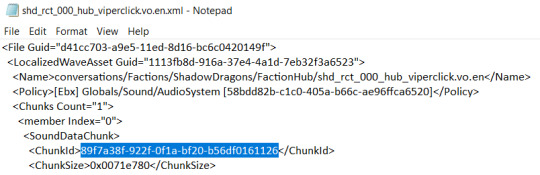
Find the vo file you want and export it, saving it as an xml file
2. Open the XML file and copy the ChunkId from it
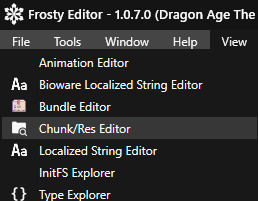
3. In Frosty, go to view->Chunk/Res Editor
4. Paste the ChunkId in and then export the chunk that comes up

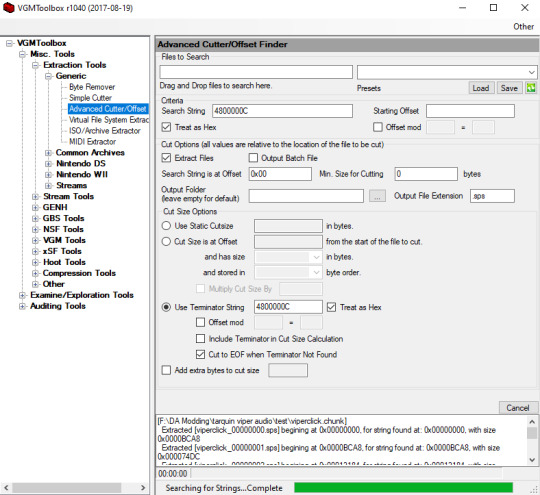
5. Download the program VGMToolbox, fill in the settings in this screenshot in Advanced Cutter/Offset, then drag and drop the chunk file in. This should give you a folder full of small .sps files
6. Download and install the program Foobar2000, then download the vgmstream foobar2000 component (the first one at the link). Once that's enabled (just double clicking got it to integrate with foobar2000 for me), the program can play or convert the sps files so you should be good to go!
#idk if all this is strictly necessary but it worked so#if i'm doing something terribly wrong so be it#asks#sydneystarlights
12 notes
·
View notes
Text
Partial......solution? for the 'your Apple Music library is permanently erased' thing?
If I restore my automatically backed up iTunes library, it DOES successfully load everything buuuut as soon as it connects to Apple Music it gets immediately overwritten.
SO. I am combining two pieces of information.
a) helpfully, while telling me there's no way to retrieve my library, the Apple Support guy told me 'in future you can back your playlists and library up on Windows as XMLs, and it will just save the names of the files'
b) I happen to know, due to using iTunes to burn illegal CDs, that it still stores your Apple Music library list when it's offline, you just can't play any that aren't stored locally.
SO BECAUSE I AM THE BIGBRAINED GENIUS, I COMBINED THESE FACTS TO PUT MY LAPTOP IN AIRPLANE MODE, EXPORT MY LIBRARY AS AN XML, THEN RECONNECT AND IMPORT THE XML.
there are just 2 teensy problems
1) iTunes automatically backs up when you use it for a good amount of time, but I mostly use Apple Music on my phone so the most recent backup is March, and I've added like 10 albums minimum since then.
2) uhhhh so. it appears to have caused an issue that I assume is because of exporting while offline. So it doesn't actually recognise any of the files.

All of them are appearing as missing files. Except. And I TRULY cannot explain this. Every Time We Touch by Cascada.
So! In summary, I haven't managed to restore my library, which is a bummer. I have, however, at least, managed to produce a stable list of everything that I added to my library between 2013 and March 2024, which combined with my Recently Played should probably include almost everything. I have a long hard slog of going through and reading everything but all is not fully lost.

17 notes
·
View notes
Note
about the 🧡!!! the description says “edited with”… to me that feels likely that the editor made a rough cut and then phil goes in adding effects and the finer details?
maybe it’s just me but since it’s his solo channel it feels more likely that he would want to be in charge of the more creative things like torturing us while letting someone else do the rough cut? what do you think??
id wanna know what their process is to judge properly cos when i edit with someone i either send it back and forth getting notes of changes as i go, edit in the room with someone else which obviously doesnt apply here or send the edit files to the person and let them make changes (which i actually would never do like don’t touch my shit) but like all of these ways would mean we would just get rid of the 🧡 and replace it with the other, not put it over the top like that
like if Kris did the rough cut he shouldn’t be sending an exported version to phil he should be sending the project files but i know that Kris edits with premiere and phil edits with final cut (which annoys me to no end) but he could send phil the xml file and still be able to cross edit on different programs but this doesn’t always work properly and that’s why the first way i mentioned works better and is what i feel like they should be doing and still be able put “edited with” even tho technically one person did the editing and the other just gave feedback
anyway i’m sure im saying things no one cares about but man i care about the post production process too much 😂
anyway that 🧡 regardless of how it ended up there is so tortuous for all of us 😭
24 notes
·
View notes
Text

Hi! I love your mods, specifically your more complex recipes mod, but since it is incompatible with cinderellimouse’s cooking and ingredients overhaul mod, I have been playing without that mod, is there any way to make them compatible?
Hi, and thank you! To see what differences there are between mods that modify the same XML or ITUN resource, I like to export those resources, open them both in Notepad++, and use its Plugins \ Compare \ Compare feature.
In the image below, I've extracted the RecipeMasterList XML from both mods, renamed them "[SD]" and "[CM]" to tell them apart more easily, and from that point it's just a matter of seeing what differences there are between the two documents, and changing what you want — of course, bearing in mind what other modifications CM introduces, like new ingredients (I've never used that mod). Additions are listed in green, changes are listed in yellow.

Of course, it is preferable to apply any modifications to CM's mod and discard mine, since I assume you want the additional stuff that comes with CM's mod.
After you're done, save the .xml and import it over the one in CM's mod (where you previously extracted it from). Make sure to right-click the XML (instance 0xC804E72F531C6AAD) and use the Replace function, since S3PE won't import it otherwise because of the name change.
9 notes
·
View notes
Text
you do NOT want to know where all these codes come from, it's not worth it. i dont want to do this for all 400 regions in the game

oh my GOD the RIDICULOUS number of steps you have to take to find the actual definitions of each area's regions in the dai files
#i probably will do it eventually but im stopping for today. im glad enough to have just worked it out#but.........IT'S NOT EVEN THE SAME FOR EVERY AREA. LET ME JUST THROW THAT IN TOO.#the key to solving this was working out that i couldnt do it in frosty. i had to look at the xml dump#there are two relevant files for each area: the region file and the region schematic file#the schematic file has the names of the regions and the region file has..............seemingly nothing! UNTIL YOU CHECK THE EXPORTED XML#AND IT HAS ALL THE COORDINATES#but how do you find out which coordinates go with which region?#you find out which target hex code is associated with each region by searching the guid in the separate DESIGN file#you then find that code in the region notification manager file (some areas have their own; otherwise you use the generic one)#it will link to a logic file. search for the guid of that logic file and you will find ANOTHER hex code#search for that code back in the DESIGN file and it will give you the guid of the region's coordinate data in the region file#(the region file that is BLANK in frosty)#god like obviously it's not made like this when they're actually designing the game but WHY does it get saved like this ffs#personal#sorry im VENTING this is VERY EMOTIONAL FOR ME ive been trying to work out region coords for SO LONG#like yeah spoilers i wanted to map the regions on each area map as a cool reference. i had NO IDEA what i was getting into. yeesh.#oh and also. what you see here is a SIMPLE version. areas that arent too major just have rectangular regions; only 2 points#when i briefly looked at the coord data for regions in major areas some of them had 9 points. like i knew they wouldnt all be rectangles..#that doesnt bother me much. it just makes me sad about how this spreadsheet will look in the end
1 note
·
View note
Text
holy grail of last.fm and spotify music data sites. i'd still say check the actual link but i've copy pasted most of the info n the links below
Spotify
Sites, apps and programs that use your Spotify account, Spotify API or both.
Spotify sites:
Obscurify: Tells you how unique you music taste is in compare to other Obscurify users. Also shows some recommendations. Mobile friendly.
Skiley: Web app to better manage your playlists and discover new music. This has so many functions and really the only thing I miss is search field for when you are managing playlists. You can take any playlist you "own" and order it by many different rules (track name, album name, artist name, BPM, etc.), or just randomly shuffle it (say bye to bad Spotify shuffle). You can also normalize it. For the other functions you don't even need the rights to edit the playlist. Those consists of splitting playlist, filtering out song by genre or year to new playlist, creating similar playlists or exporting it to CFG, CSV, JSON, TXT or XML.
You can also use it to discover music based on your taste and it has a stats section - data different from Last.fm.
Also, dark mode and mobile friendly.
Sort your music: Lets you sort your playlist by all kinds of different parameters such as BPM, artist, length and more. Similar to Skiley, but it works as an interactive table with songs from selected playlist.
Run BPM: Filters playlists based on parameters like BPM, Energy, etc. Great visualized with colorful sliders. Only downside - shows not even half of my playlists. Mobile friendly.
Fylter.in: Sort playlist by BMP, loudness, length, etc and export to Spotify
Spotify Charts: Daily worldwide charts from Spotify. Mobile friendly
Kaleidosync: Spotify visualizer. I would personally add epilepsy warning.
Duet: Darthmouth College project. Let's you compare your streaming data to other people. Only downside is, those people need to be using the site too, so you have to get your friends to log in. Mobile friendly.
Discover Quickly: Select any playlist and you will be welcomed with all the songs in a gridview. Hover over song to hear the best part. Click on song to dig deeper or save the song.
Dubolt: Helps you discover new music. Select an artist/song to view similar ones. Adjust result by using filters such as tempo, popularity, energy and others.
SongSliders: Sort your playlists, create new one, find new music. Also can save Discover weekly every monday.
Stats for Spotify: Shows you Top tracks and Top artists, lets you compare them to last visit. Data different from Last.fm. Mobile friendly
Record Player: This site is crazy. It's a Rube Goldberg Machine. You take a picture (any picture) Google Cloud Vision API will guess what it is. The site than takes Google's guess and use it to search Spotify giving you the first result to play. Mobile friendly.
Author of this site has to pay for the Google Cloud if the site gets more than 1000 requests a month! I assume this post is gonna blow up and the limit will be easily reached. Author suggests to remix the app and set it up with your own Google Cloud to avoid this. If your are able to do so, do it please. Or reach out to the author on Twitter and donate a little if you can.
Spotify Playlist Randomizer: Site to randomize order of the songs in playlist. There are 3 shuffling methods you can choose from. Mobile friendly.
Replayify: Another site showing you your Spotify data. Also lets you create a playlist based on preset rules that cannot be changed (Top 5 songs by Top 20 artists from selected time period/Top 50 songs from selected time period). UI is nice and clean. Mobile friendly, data different from Last.fm.
Visualify: Simpler replayify without the option to create playlists. Your result can be shared with others. Mobile friendly, data different from Last.fm.
The Church Of Koen: Collage generator tool to create collages sorted by color and turn any picture to collage. Works with Last.fm as well.
Playedmost: Site showing your Spotify data in nice grid view. Contains Top Artists, New Artists, Top Tracks and New Tracks. Data different from Last.fm, mobile friendly.
musictaste.space: Shows you some stats about your music habits and let's you compare them to others. You can also create Covid-19 playlist :)
Playlist Manager: Select two (or more) playlists to see in a table view which songs are shared between them and which are only in one of them. You can add songs to playlists too.
Boil the Frog: Choose to artists and this site will create playlists that slowly transitions between one artist's style to the other.
SpotifyTV: Great tool for searching up music videos of songs in your library and playlists.
Spotify Dedup and Spotify Organizer: Both do the same - remove duplicates. Spotify Dedup is mobile friendly.
Smarter Playlists: It lets you build a complex program by assembling components to create new playlists. This seems like a very complex and powerful tool.
JBQX: Do you remember plug.dj? Well this is same thing, only using Spotify instead of YouTube as a source for music. You can join room and listen to music with other people, you all decide what will be playing, everyone can add a song to queue.
Spotify Buddy: Let's you listen together with other people. All can control what's playing, all can listen on their own devices or only one device can be playing. You don't need to have Spotify to control the queue! In my opinion it's great for parties as a wireless aux cord. Mobile friendly.
Opslagify: Shows how much space would one need to download all of their Spotify playlists as .mp3s.
Whisperify: Spotify game! Music quiz based on what you are listening to. Do you know your music? Mobile friendly.
Popularity Contest: Another game. Two artists, which one is more popular according to Spotify data? Mobile friendly, doesn't require Spotify login.
Spotify Apps:
uTrack: Android app which generates playlist from your top tracks. Also shows top artists, tracks and genres - data different from Last.fm.
Statistics for Spotify: uTrack for iOS. I don't own iOS device so I couldn't test it. iOS users, share your opinions in comments please :).
Spotify Programs:
Spicetify: Spicetify used to be a skin for Rainmeter. You can still use it as such, but the development is discontinued. You will need to have Rainmeter installed if you want to try. These days it works as a series of PowerShell commands. New and updated version here. Spicetify lets you redesign Spotify desktop client and add new functions to it like Trash Bin, Shuffle+, Christian Mode etc. It doesn't work with MS Store app, .exe Spotify client is required.
Library Bridger: The main purpose of this program is to create Spotify playlists from your locally saved songs. But it has some extra functions, check the link.
Last.fm
Sites, apps and programs using Last.fm account, Last.fm API or both.
Last.fm sites:
Last.fm Mainstream Calculator: How mainstream is music you listen to? Mobile friendly.
My Music Habits: Shows different graphs about how many artists, tracks and albums from selected time period comes from your overall top artists/tracks/albums.
Explr.fm: Where are the artists you listen to from? This site shows you just that on interactive world map.
Descent: The best description I can think of is music dashboard. Shows album art of currently playing song along with time and weather.
Semi-automatic Last.fm scrobbler: One of the many scrobblers out there. You can scrobble along with any other Last.fm user.
The Universal Scrobbler: One of the best manual scrobblers. Mobile friendly.
Open Scrobbler: Another manual scrobbler. Mobile friendly
Vinyl Scrobbler: If you listen to vinyl and use Last.fm, this is what you need.
Last.fm collage generator, Last.fm top albums patchwork generator and yet another different Last.fm collage generator: Sites to make collages based on your Last.fm data. The last one is mobile friendly.
The Church Of Koen: Collage generator tool to create collages sorted by color and turn any picture to collage. Works with Spotify as well.
Musicorum: So far the best tool for generating collages based on Last.fm data that I ever seen. Grid up to 20x20 tiles and other styles, some of which resemble very well official Spotify collages that Spotify generates at the end of the year. Everything customizable and even supports Instagram story format. Mobile friendly.
Nicholast.fm: Simple site for stats and recommendations. Mobile friendly.
Scatter.fm: Creates graph from your scrobbles that includes every single scrobble.
Lastwave: Creates a wave graph from your scrobbles. Mobile friendly.
Artist Cloud: Creates artist cloud image from you scrobbles. Mobile friendly.
Last.fm Tools: Lets you generate Tag Timeline, Tag Cloud, Artist Timeline and Album Charter. Mobile friendly.
Last Chart: This site shows different types of beautiful graphs visualizing your Last.fm data. Graph types are bubble, force, map, pack, sun, list, cloud and stream. Mobile friendly.
Sergei.app: Very nice looking graphs. Mobile friendly.
Last.fm Time Charts: Generates charts from your Last.fm data. Sadly it seems that it only supports artists, not albums or tracks.
ZERO Charts: Generates Billboard like charts from Last.fm data. Requires login, mobile friendly.
Skihaha Stats: Another great site for viewing different Last.fm stats.
Jakeledoux: What are your Last.fm friends listening to right now? Mobile friendly.
Last History: View your cumulative listening history. Mobile friendly.
Paste my taste: Generates short text describing your music taste.
Last.fm to CSV: Exports your scrobbles to CSV format. Mobile friendly.
Pr.fm: Syncs your scrobbles to your Strava activity descriptions as a list based on what you listened to during a run or biking session, etc. (description by u/mturi, I don't use Strava, so I have no idea how does it work :))
Last.fm apps:
Scroball for Last.fm: An Android app I use for scrobbling, when I listen to something else than Spotify.
Web Scrobbler: Google Chrome and Firefox extension scrobbler.
Last.fm programs:
Last.fm Scrubbler WPF: My all time favourite manual scrobbler for Last.fm. You can scrobbler manually, from another user, from database (I use this rather than Vinyl Scrobbler when I listen to vinyls) any other sources. It can also generate collages, generate short text describing your music taste and other extra functions.
Last.fm Bulk Edit: Userscript, Last.fm Pro is required. Allows you to bulk edit your scrobbles. Fix wrong album/track names or any other scrobble parameter easily.
8 notes
·
View notes